
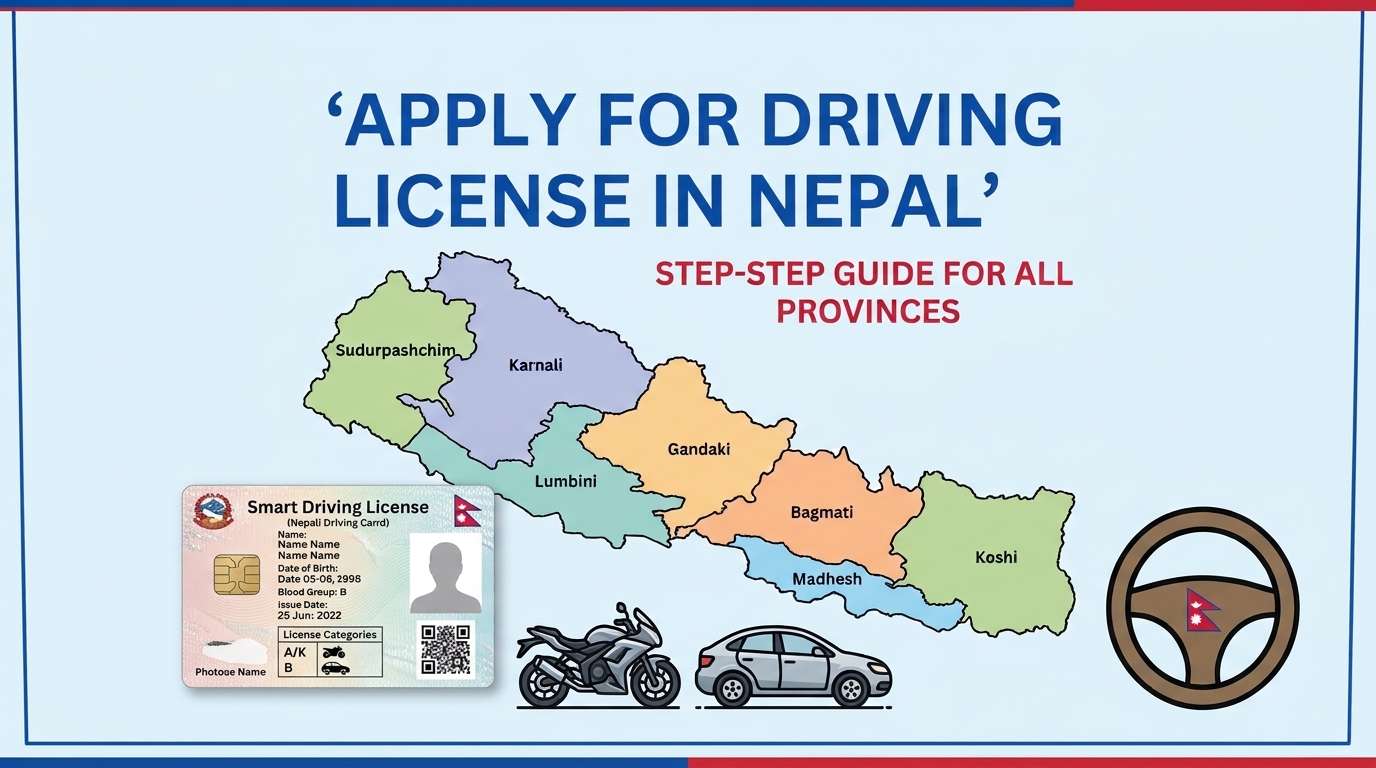
If you are trying to fill out your online driving license Nepal form, you might be wondering which website to use or how to even get started. Trust me, you are not the only one getting confused with the process!
While applying for a driving license form Nepal has gotten much smoother over time, each province now uses its own system. To make things super easy for you, we have put together this step-by-step guide. Below, you’ll find all the required documents (including how to use the Nagarik App), direct portal links for all 7 provinces, and a clear tutorial so you can submit your EDLMC Nepal online form and apply driving license online Nepal without making mistakes.
What Do You Need Before Applying? (Required Documents)
Before you sit down to fill out the form, make sure you have these things ready on your phone or computer so you don’t get stuck in the middle:
- National ID Card (NID Number): An NID is now mandatory for the application. If you haven’t received your physical card yet, don’t worry you can simply use the NID number printed on the slip you received during biometric registration, along with a clear photo of that slip (both front and back).
- Mobile Number in Your Own Name & Email ID: You will need to provide a mobile number and email address to receive OTP (One-Time Password) verification codes. Keep in mind that the mobile number you enter must be registered under your own name, as the portal verifies the SIM ownership details.
- Citizenship Certificate: Keep clear photos or scanned copies of both the front and back sides of your Nepali citizenship certificate ready on your device (maximum file size up to 1 MB per image), as you will need to upload them during the application process.
- Active Email Address: You will need an active email to receive OTP verification codes and status updates.
- Personal & Family Details: Keep your Citizenship card handy for accurate personal information, address, and family details.
- Online Payment Option: Keep eSewa, ConnectIPS, or your Mobile Banking app ready to pay the application fee online.
(Note: If you have the Nagarik App installed, you can also use its QR code feature for quick verification.)
Direct Online Driving License Links for All 7 Provinces
To apply for an online driving license Nepal, you must visit the official portal of your respective province. Since each province manages its own transport management system, using the correct link is important to avoid application errors.
Below is the updated list of official direct links to submit your EDLMC Nepal online form across all 7 provinces:
| Province Name | Official Application Portal | Status |
| Koshi Province | Koshi Driving License Portal | Active |
| Madhesh Province | Madhesh Driving License Portal | Active |
| Bagmati Province | Bagmati Transport Portal | Active |
| Gandaki Province | Gandaki Driving License Portal | Active |
| Lumbini Province | Lumbini Transport Portal | Active |
| Karnali Province | Karnali Driving License Portal | Active |
| Sudurpashchim Province | Sudurpashchim Transport Portal | Active |
(Note: Make sure your internet connection is stable and keep your NID slip ready before clicking on your provincial link.)
Step-by-Step Guide: How to Apply for Driving License Online in Nepal
Once you click on your provincial link from the table above, follow these simple steps to fill out and submit your EDLMC Nepal online form:
Step 1: Choose Your Required Service Option
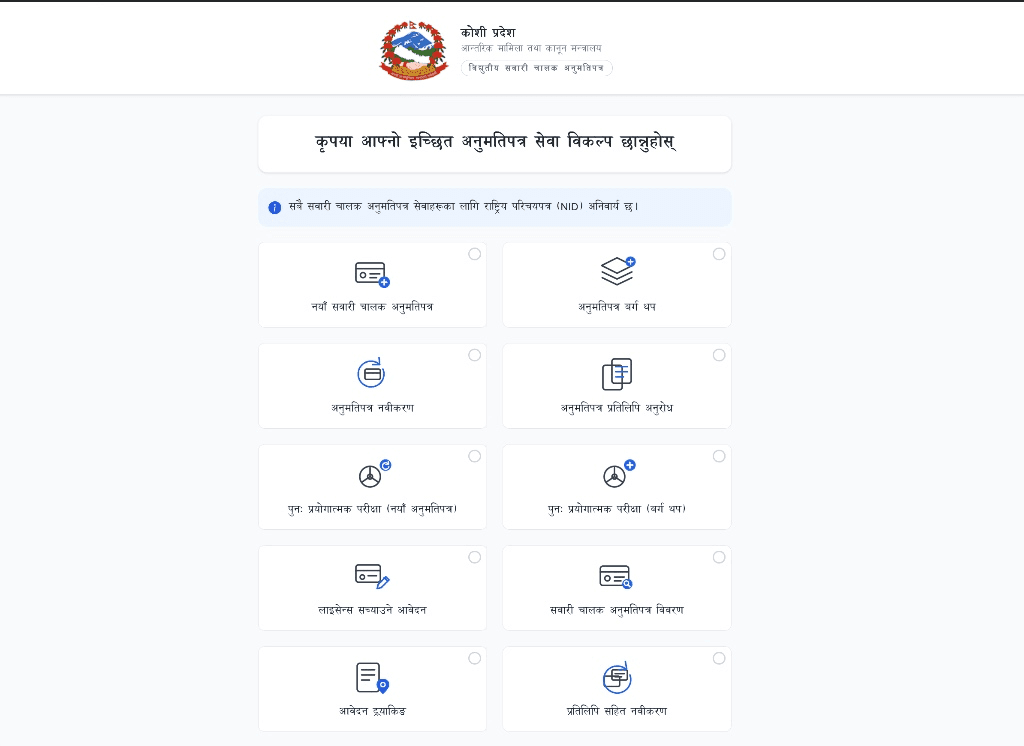
Once you open your provincial portal from the table above, the official homepage will appear on your screen just like the example image shown below.
- Important Notice: At the top of the page, you will see a clear notification stating that National ID (NID) is mandatory for all driving license services.
- Select Service: Click on ‘नयाँ सवारी चालक अनुमतिपत्र’ (New Driving License) to begin your new application, as you can see in the example image below.
Step 2: Choose Your Registration Method & Understanding the 9-Step Process
After selecting the new driving license service, you will be directed to a page where you need to choose your preferred registration method to proceed further, as shown in the example image below. At the top of this page, you will also notice a progress bar indicating 9 distinct steps that you must successfully complete from start to finish (Application, Medical Fee, Medical, Application & Exam Fee, Office Approval, Written Exam, Trial, License Fee, and License Generation).
You will find the following registration options on this page:
Important Note: Whether you choose the National Identity Card option or the Nagarik App QR method, the system ultimately requires National ID (NID) verification. Since an NID is now mandatory for driving license applications in Nepal, both methods are closely connected. It is always best to keep your NID number or biometric slip ready before proceeding with either option.
National Identity Card (राष्ट्रिय परिचय पत्र मार्फत): If you are a Nepali citizen, you can choose this option to start your application process directly using your National Identity Card number.
Nagarik App QR Code (नागरिक एप क्युआर कोड मार्फत): You can also scan the QR code via the Nagarik App to quickly initiate and verify your driving license application process.i
Foreign Passport (विदेशी पासपोर्ट मार्फत): If you are a foreign national, this option allows you to begin your application using your passport number or any other valid national identification document.
Diplomatic / Consular ID (कूटनीतिक / वाणिज्यदूत परिचय पत्र मार्फत): This option is specifically for diplomatic or consular officials, where they can apply using their passport, visa, diplomatic ID, consular recommendation letter, and home country driving license. (Note: Written exams and trials are not required for this category.)
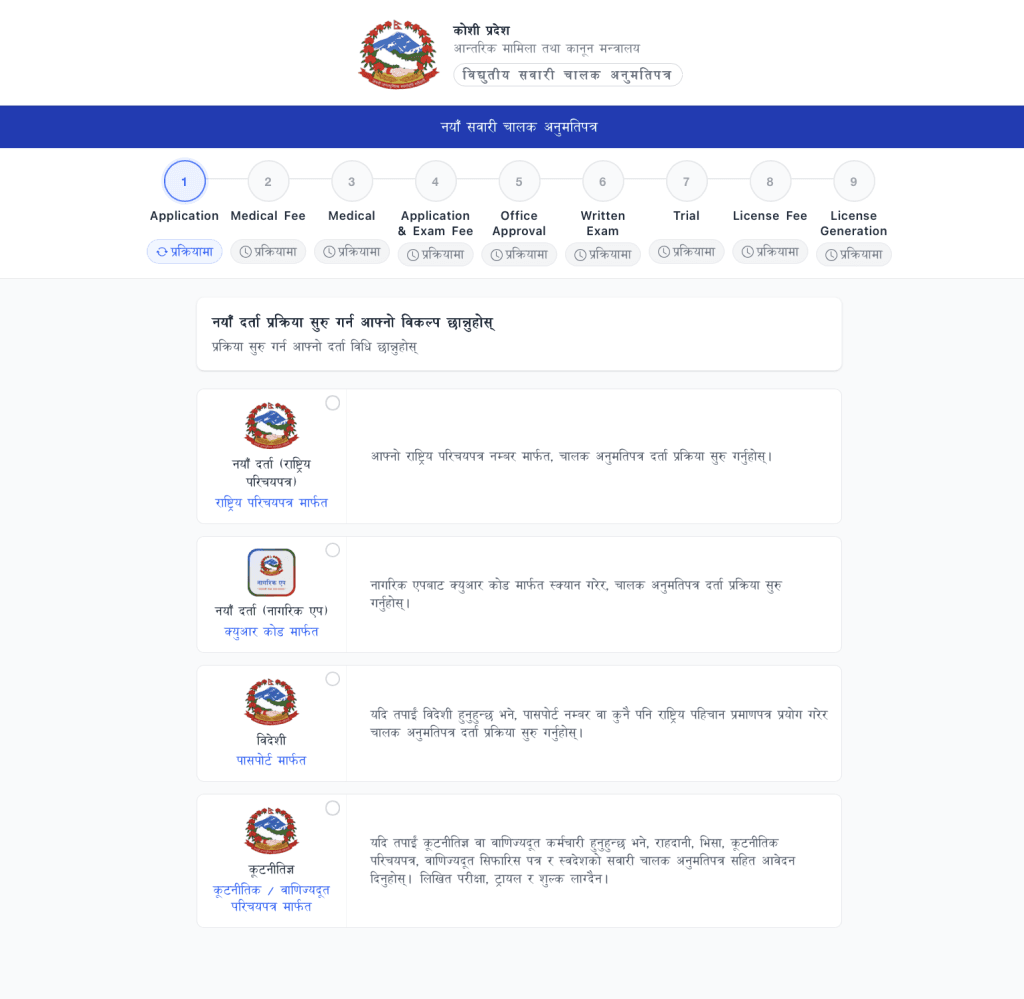
Note: Although there are multiple options available, in this guide, we will focus on applying through the National Identity Card (राष्ट्रिय परिचय पत्र मार्फत) method, as it is the most common and direct process for new applicants.
Step 3: Enter Your National ID (NID) Details
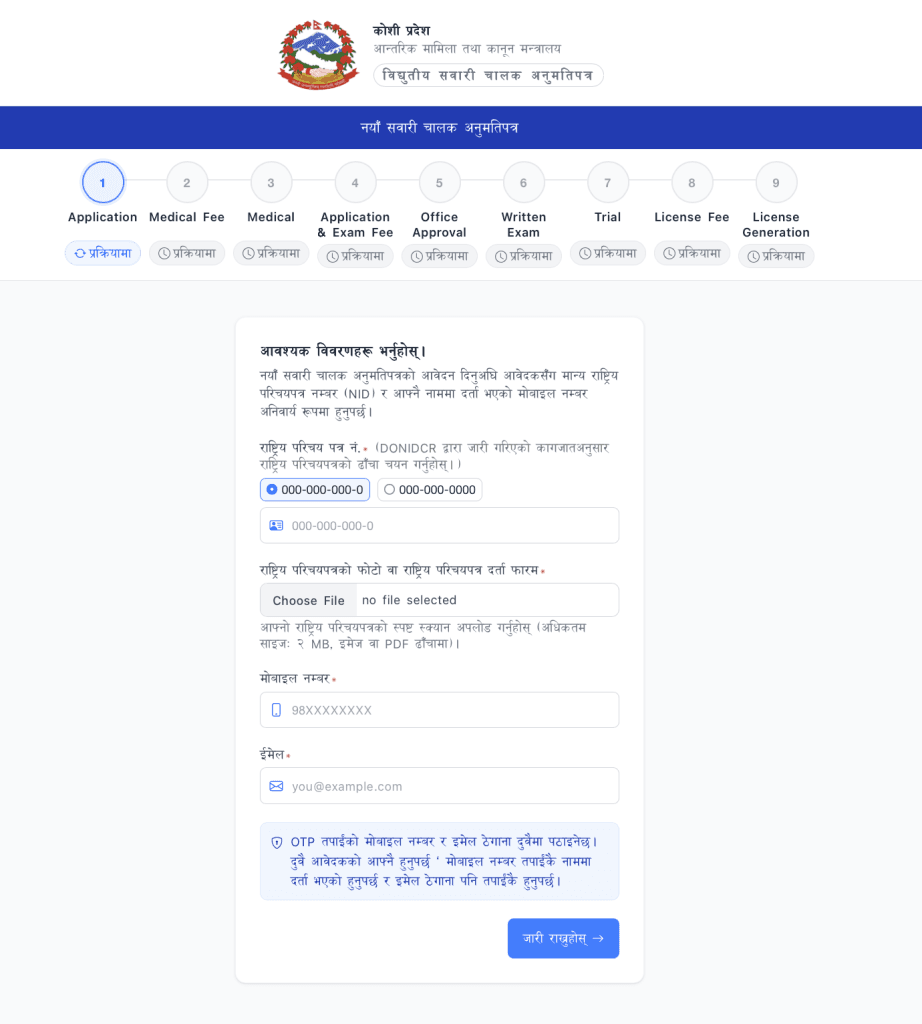
Once you select the National Identity Card option, a new form page will open on your screen, as shown in the example image below. Here, you need to carefully fill in your required identification and contact details:
- National ID Number (राष्ट्रिय परिचय पत्र नं.): Enter your 10-digit National ID number accurately based on the format provided by DONIDCR. If you don’t have the physical card yet, you can use the number from your biometric registration slip.
- Upload NID Photo or Registration Form (राष्ट्रिय परिचय पत्रको फोटो वा राष्ट्रिय परिचय पत्र दर्ता फारम): Choose and upload a clear scanned copy or photo of your NID slip/card (maximum size 2 MB, in image or PDF format).
- Mobile Number (मोबाइल नम्बर): Enter a mobile number that is strictly registered under your own name, as the system checks ownership details automatically.
- Email Address (इमेल): Provide an active email address where status updates and verification codes can be sent.
- OTP Verification Notice: As noted on the portal, an OTP (One-Time Password) will be sent to both your mobile number and email address, so make sure both belong to you.
Finally, click on the ‘जारी राख्नुहोस्’ (Proceed / Continue) blue button to move to the next step, as you can see in the example image below.
Step 4: OTP Verification & Auto-Fetched Personal Details
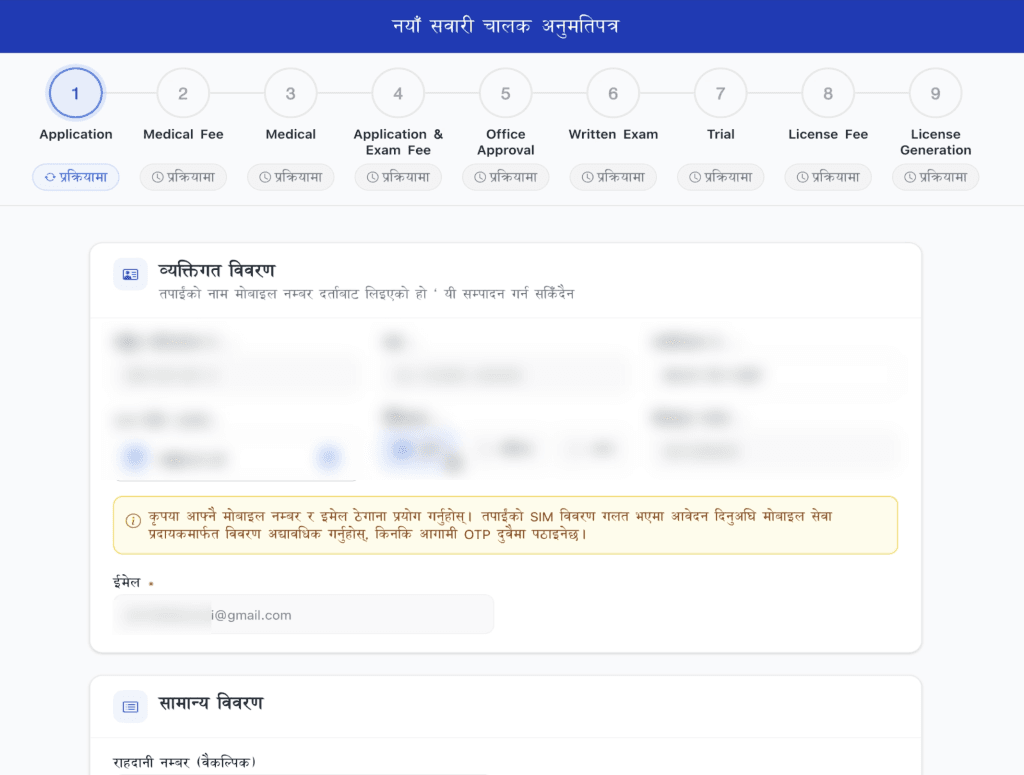
After entering the OTP codes received on your mobile number and email and clicking proceed, a new page will open showing your personal details, as seen in the example image below.
- Auto-Fetched Personal Info (व्यक्तिगत विवरण): The system automatically fetches your personal details (such as your name and ownership data) directly from your registered mobile number database.
- Non-Editable Fields: As indicated by the notice (“तपाईंको नाम मोबाइल नम्बर दर्ताबाट लिइएको हो, यी सम्पादन गर्न सकिंदैन”), these fields are locked and cannot be edited manually because they are directly linked to your SIM card registration.
- SIM Ownership Warning: A clear notice is displayed advising you to use your own mobile number and email. If your SIM details are incorrect, you must update them with your mobile service provider before applying, as future OTPs will also be sent there.
Step 5: General Details & Permanent Address
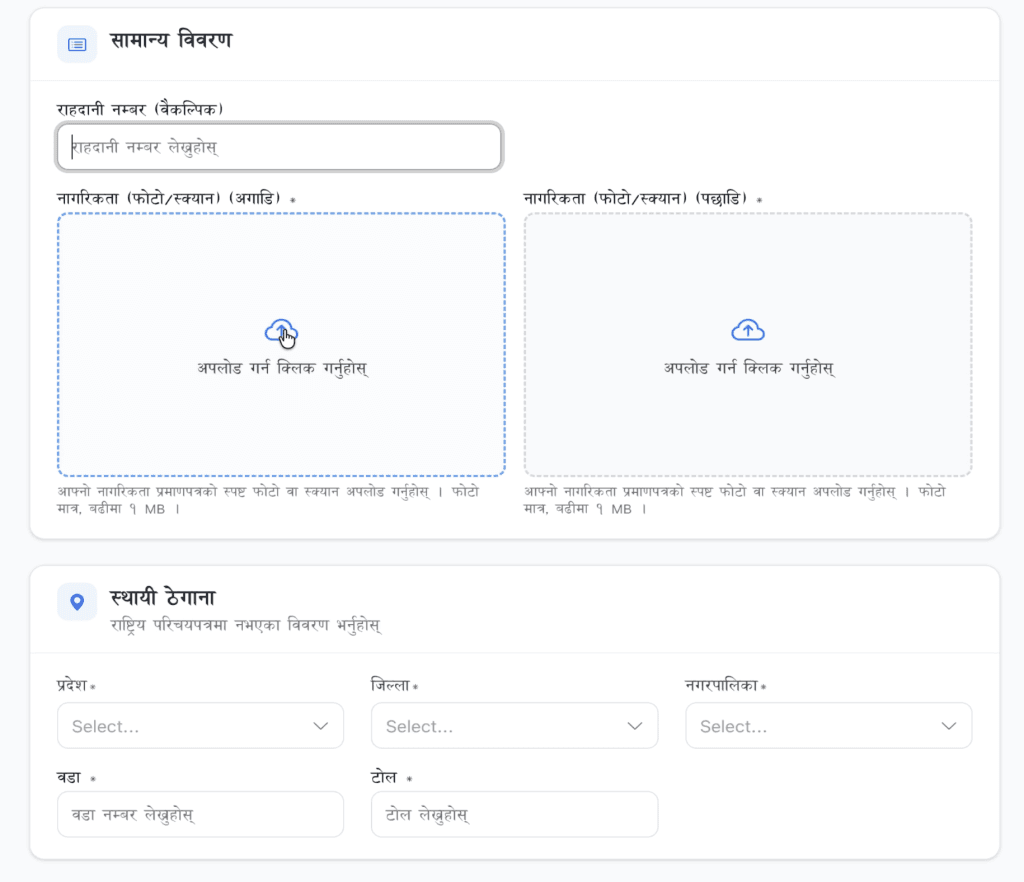
After completing the mobile and personal details, you will move to the general details section, as shown in the example image below. Here you need to fill in the following information:
- Passport Number (राहदानी नम्बर – वैकल्पिक / Optional): This field is optional. If you have a passport, you can enter your passport number; otherwise, you can leave it blank without any problem.
- Citizenship Photos (नागरिकताको फोटो/स्क्यान – अगाडि र पछाडि): You must upload clear photos or scanned copies of your citizenship certificate (both front / अगाडि and back / पछाडि sides). Make sure the image format is used and the file size is no more than 1 MB.
- Permanent Address (स्थायी ठेगाना): Fill in your permanent address details as per your National Identity Card or citizenship certificate. You need to select or type:
- Province (प्रदेश)
- District (जिल्ला)
- Municipality / Rural Municipality (नगरपालिका / गाउँपालिका)
- Ward Number (वडा नं.)
- Tole / Street (टोल)
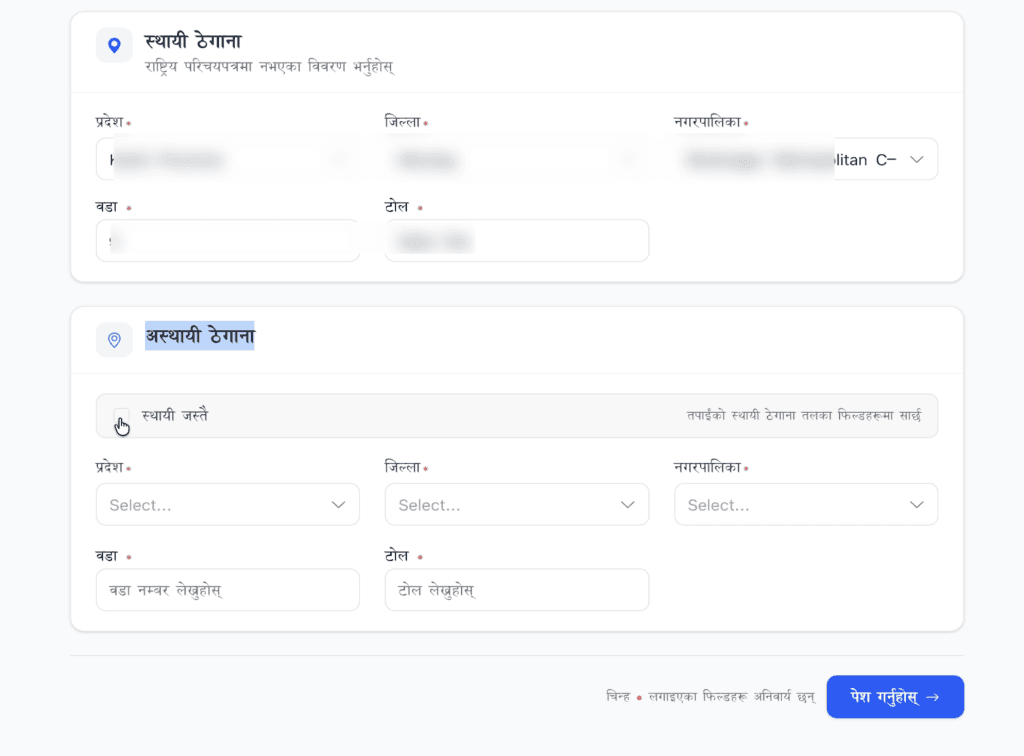
As shown in the image below, after uploading your citizenship documents, you need to fill in your address details:
- Permanent Address (स्थायी ठेगाना): Select your permanent Province, District, Municipality/Rural Municipality, Ward Number, and Tole exactly as mentioned in your official documents.
- Temporary Address (अस्थायी ठेगाना):
- If your temporary address is different from your permanent address, you can manually select and fill in your current temporary Province, District, Municipality, Ward, and Tole.
- Shortcut Tip (“स्थायी जस्तै” / Same as Permanent): If your temporary address is the same as your permanent address (for example, if you currently live in the same place where your permanent address is located), you can simply check the box that says “स्थायी जस्तै” (Same as Permanent). This will automatically copy and fill all the permanent address details into the temporary address fields instantly.
- If your temporary address is different from your permanent address, you can manually select and fill in your current temporary Province, District, Municipality, Ward, and Tole.
Finally, once all details are correctly filled, you can click on the blue ‘पेश गर्नुहोस्’ (Submit / Proceed) button to move forward.
Step 6: Select Your Driving License Category
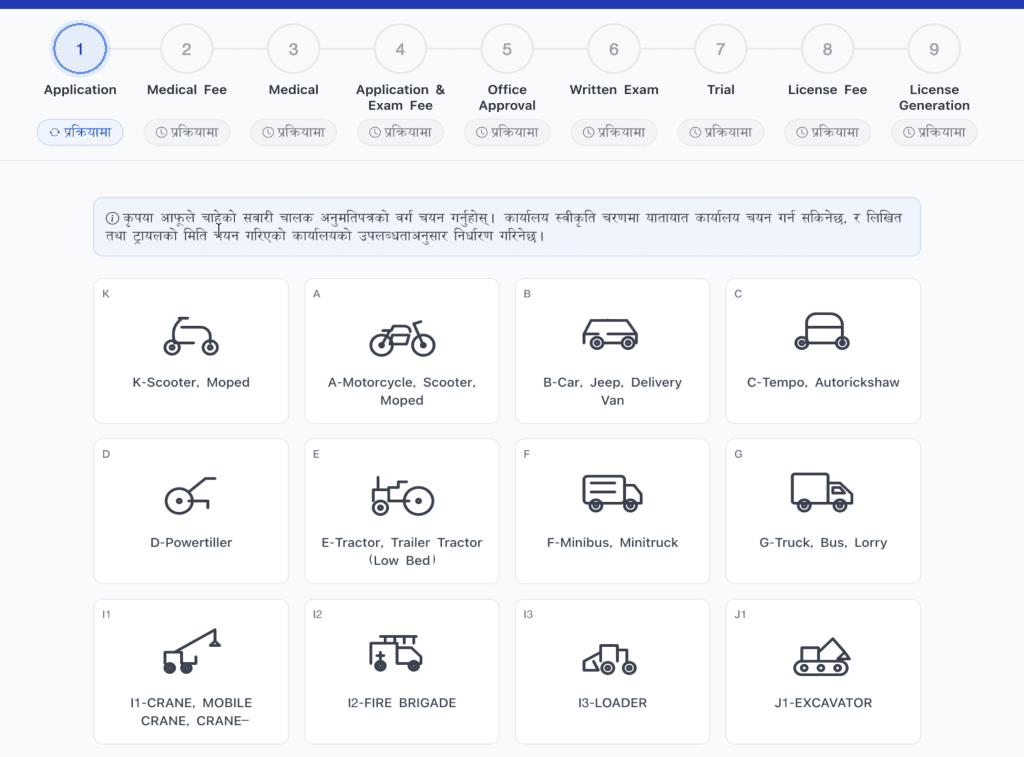
In this step, you need to select the specific vehicle category for which you want to apply for a driving license, as shown in the example images below.
- Choose Your Category: Carefully select your required vehicle category from the available options. The portal provides a wide range of vehicle classes, including:
- Category A & K: Motorcycle, Scooter, Moped.
- Category B: Car, Jeep, Delivery Van.
- Category C & C1: Tempo, Autorickshaw, and Electric Rickshaw (ERickshaw).
- Heavy & Specialized Categories: Various commercial, heavy equipment, and industrial vehicle categories are also available, such as D (Power tiller), E (Tractor/Trailer), F (Minibus/Minitruck), G (Truck/Bus/Lorry), I1-I3 (Crane, Fire Brigade, Loader), J1-J4 (Excavator, Backhoe Loader, Grader, Forklift), and H1-H2 (Dozer, Road Roller).
- Category A & K: Motorcycle, Scooter, Moped.
- Important Notice: As stated on the portal, choose your desired vehicle category carefully. During the upcoming office approval stage, you will select your transport office, and the dates for your written exam and trial will be determined based on that office’s schedule availability.
Once you have selected your appropriate category, click on the ‘पेश गर्नुहोस्’ (Submit / Proceed) button at the bottom of the page to save your selection and move forward.
Step 7: Application Submission, PDF Download & Medical Fee Payment
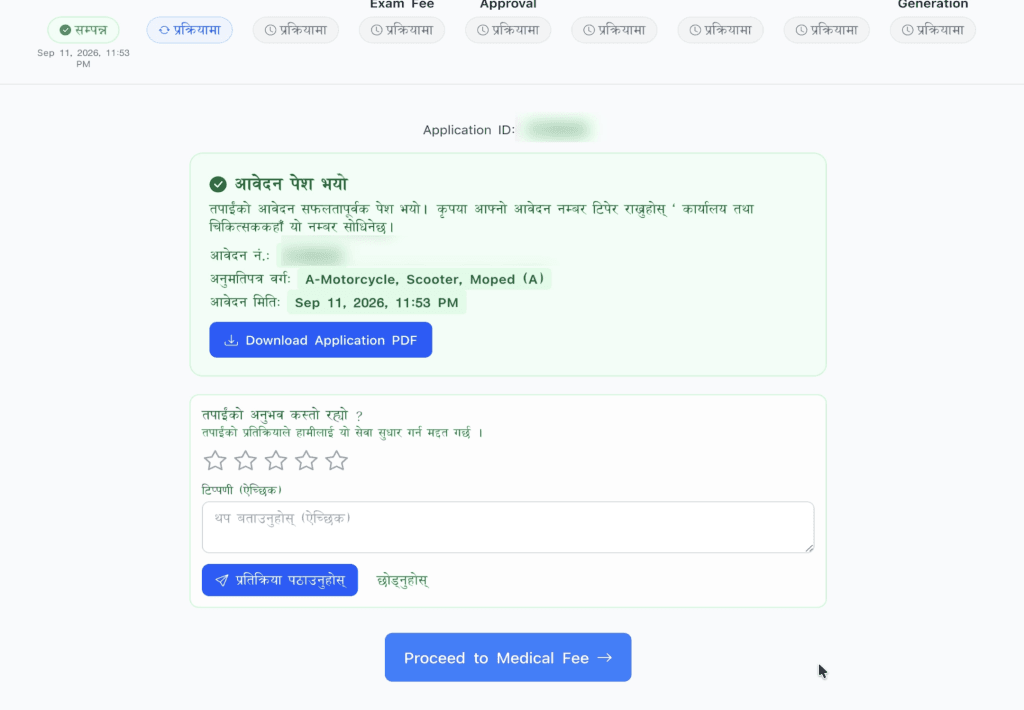
After submitting your application successfully, a confirmation screen will appear as shown in the image below.
- Application Details: It displays your Application ID, Application Number, License Category, and the exact date and time of submission.
- Download PDF: Click on the ‘Download Application PDF’ button to save a copy of your application slip. You will need this reference number and document for your medical examination and office visits.
- Proceed Further: Once downloaded, click on the ‘Proceed to Medical Fee’ button at the bottom.
Step 8: Selecting Transport Office for Medical Fee
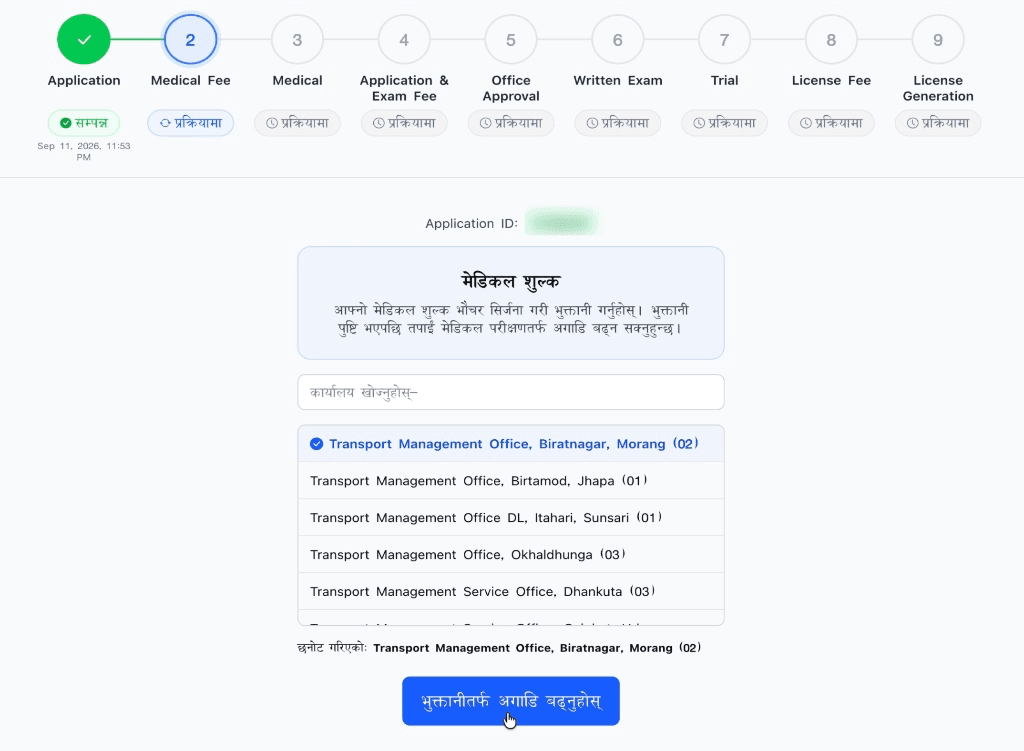
On the Medical Fee page, you need to select your respective transport office to proceed with the payment, as shown in the images below.
- Search & Select Office: Type or search your office name in the box (for example, Transport Management Office, Biratnagar).
- Proceed to Payment: After selecting your correct office, click on the ‘भुक्तानीतीतर्फ अगाडि बढ्नुहोस्’ (Proceed to Payment) button at the bottom.
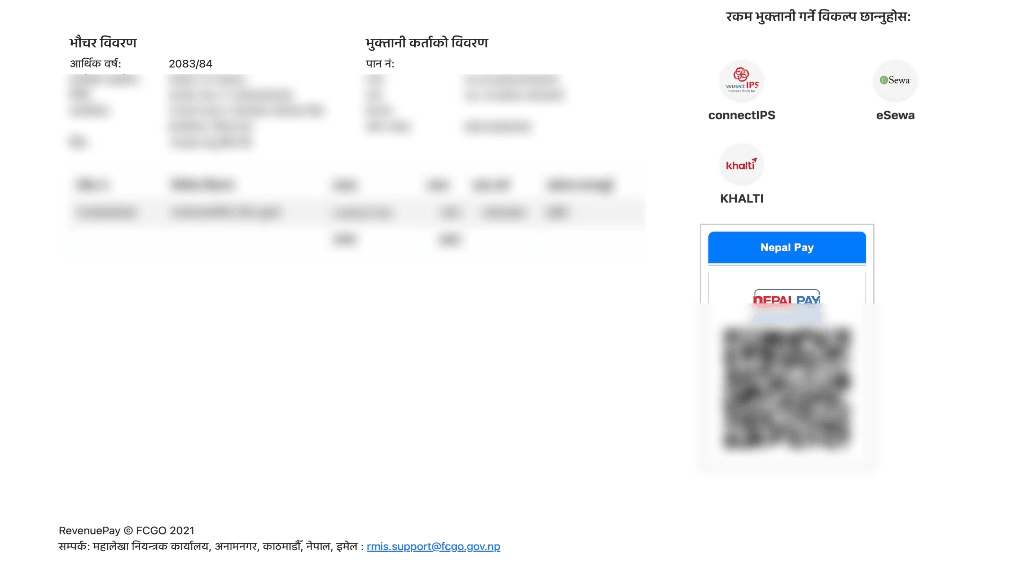
Step 9: Generating EBP Voucher & Checking Fee Details
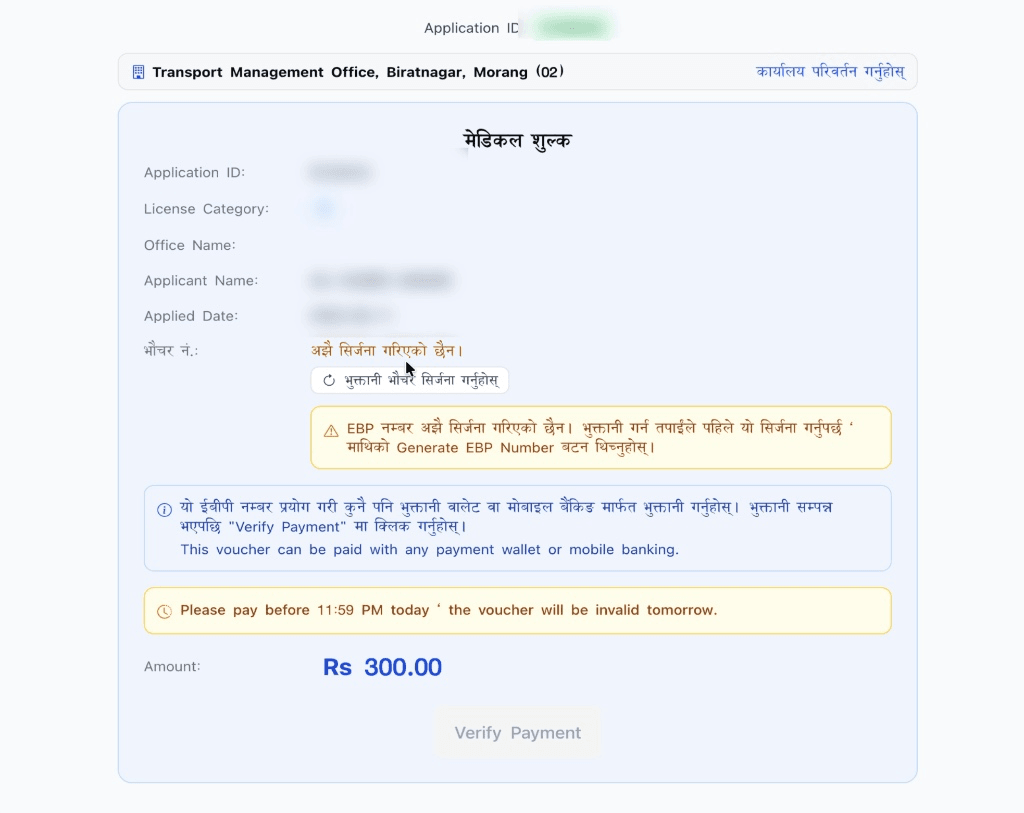
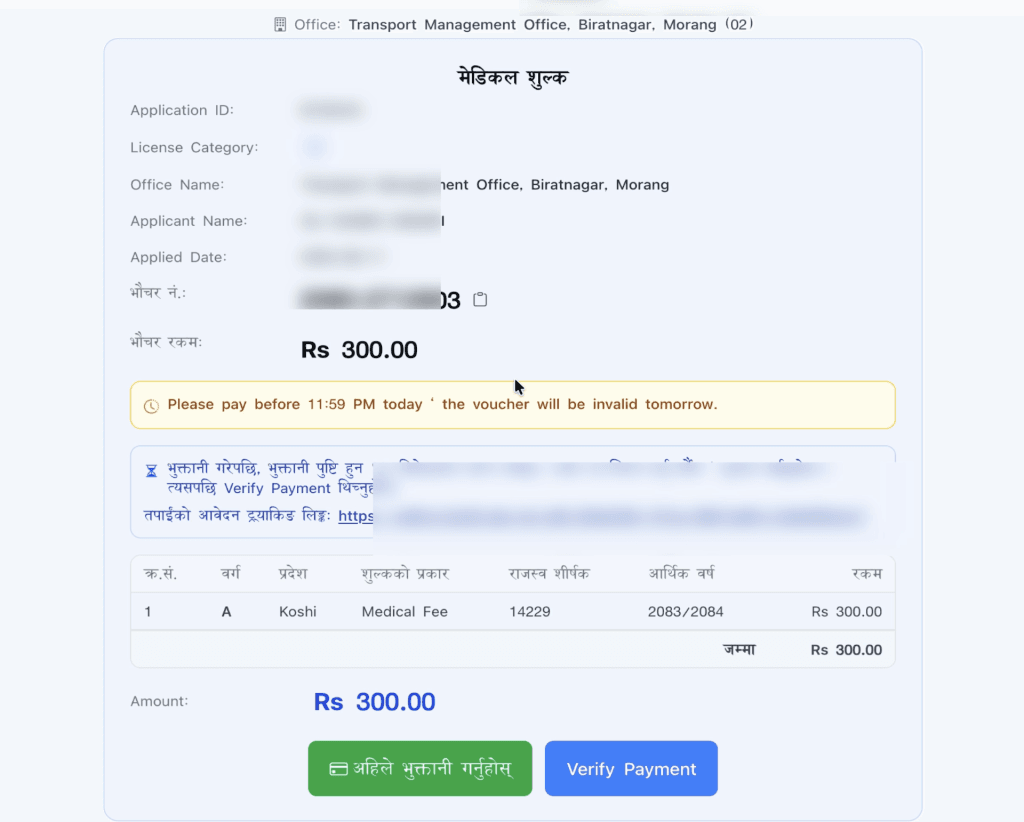
Once you select your office, the medical fee voucher page will open, as displayed in the images below.
- Generate EBP Number: If the voucher number is not generated automatically, click on the ‘भुक्तानी भौचर सिर्जना गर्नुहोस्’ (Generate EBP Number) option.
- Voucher Details: The system will generate your voucher showing your Application ID, Category, Office Name, Applicant Name, and the standard Medical Fee amount (Rs. 300.00).
- Important Deadline: Please note the warning that you must pay before 11:59 PM today, otherwise the voucher will become invalid.
- Proceed: Finally, click on the ‘अहिले भुक्तानी गर्नुहोस्’ (Pay Now) button.
Step 10: Online Payment via Wallets or Mobile Banking QR
After clicking pay now, you will be directed to the payment gateway selection page, as shown in the images below.
- Payment Options: You can choose from various digital payment options including connectIPS, eSewa, KHALTI, and Nepal Pay.
- eSewa Payment: If you choose to pay via eSewa, simply select eSewa and proceed with your login details. (Don’t have an eSewa account yet? Read our step-by-step guide on How to Create and Verify an eSewa Account to easily set up your account.)
- QR Code Method: If regular wallet checkouts encounter any issues, select Nepal Pay and scan the QR code using your mobile banking app to complete the transaction instantly.
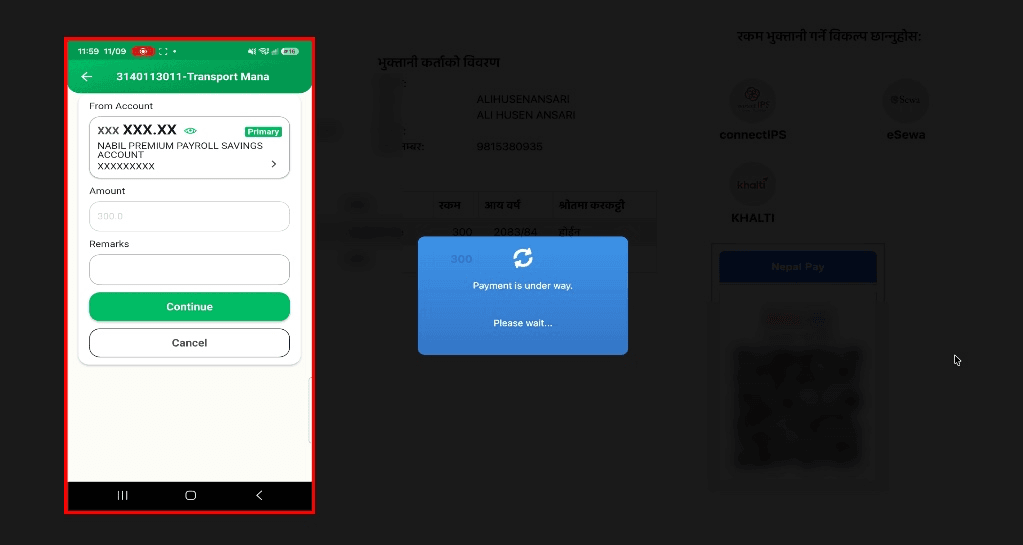
- Redirect to Portal: Once the payment is successfully completed, the system will automatically redirect you back to the official Department of Transport Management (DoTM) portal.
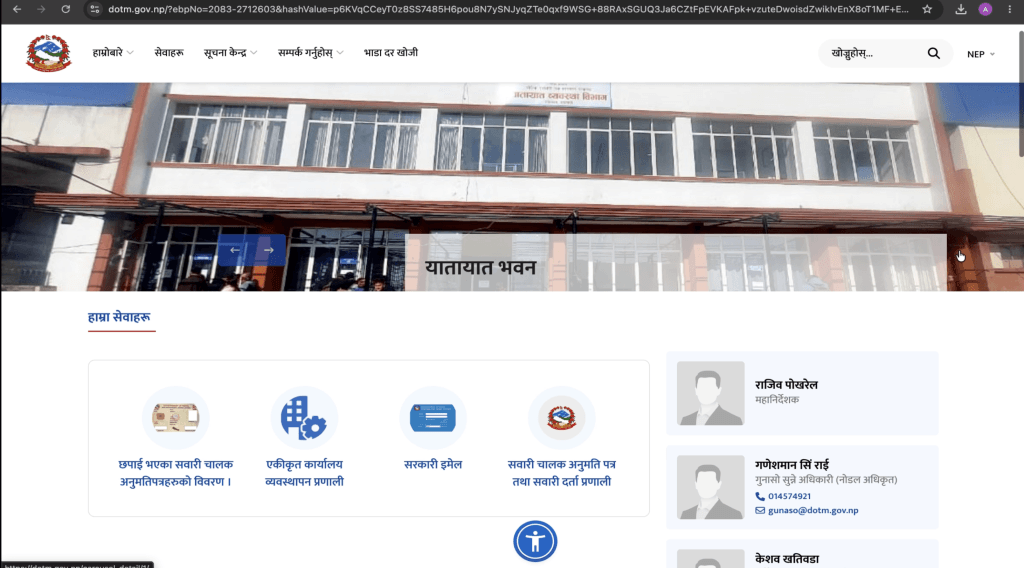
Step 11: Tracking Application Status & Medical Examination Details
After successfully submitting your application and paying the medical fee, you can easily track your application status using the downloaded PDF slip, as shown in the images below.
- Use the Downloaded PDF Slip: Open the application PDF slip that you downloaded in Step 7. Inside the PDF, you will find your application details along with a ‘Scan to Track’ QR Code.
- Scan the QR Code: Scan this QR code using your smartphone camera or any QR scanner app. It will instantly redirect you back to your application tracking page on the official DoTM portal.
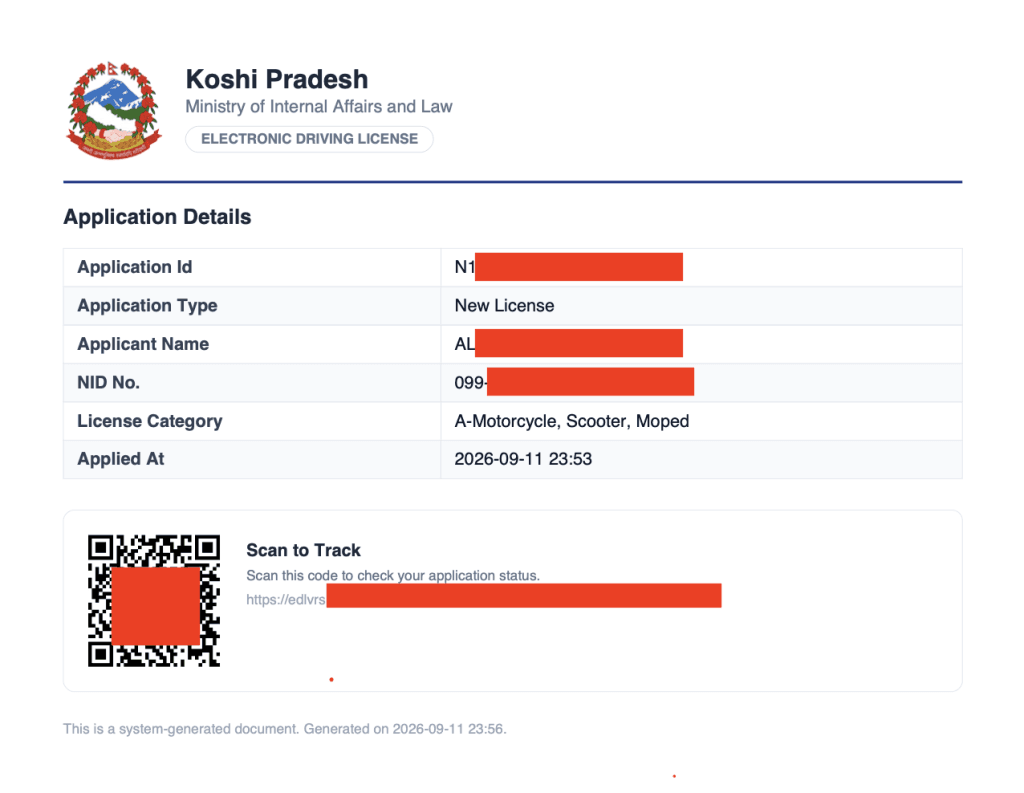
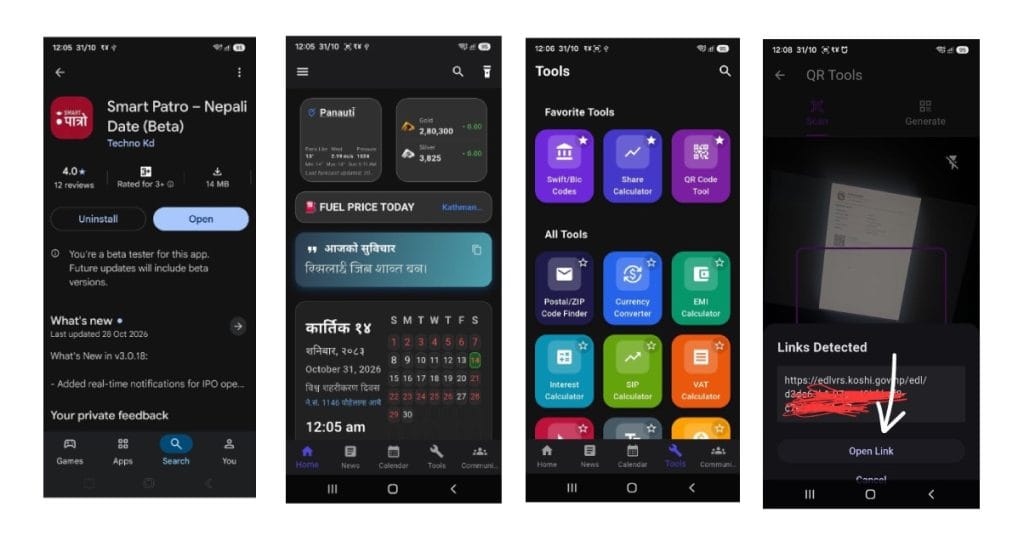
Don’t have a direct QR code scanner on your phone?
If your mobile camera doesn’t support built-in QR scanning, you can easily use our official utility app Smart Patro – Nepali Date. Simply open the app, go to Tools > QR Code Tool, and scan the PDF QR code. It will instantly detect and display the official link (Open Link), allowing you to track your driving license application seamlessly in one tap!
- Check Status & Medical Instructions: Once the tracking page opens, you can see your current progress (such as green checkmarks for completed steps like Application and Medical Fee). The portal will also display important instructions regarding your medical examination, such as visiting your chosen transport office (e.g.,Transport Management Office, Biratnagar) with your application number so they can update your medical report in the system.
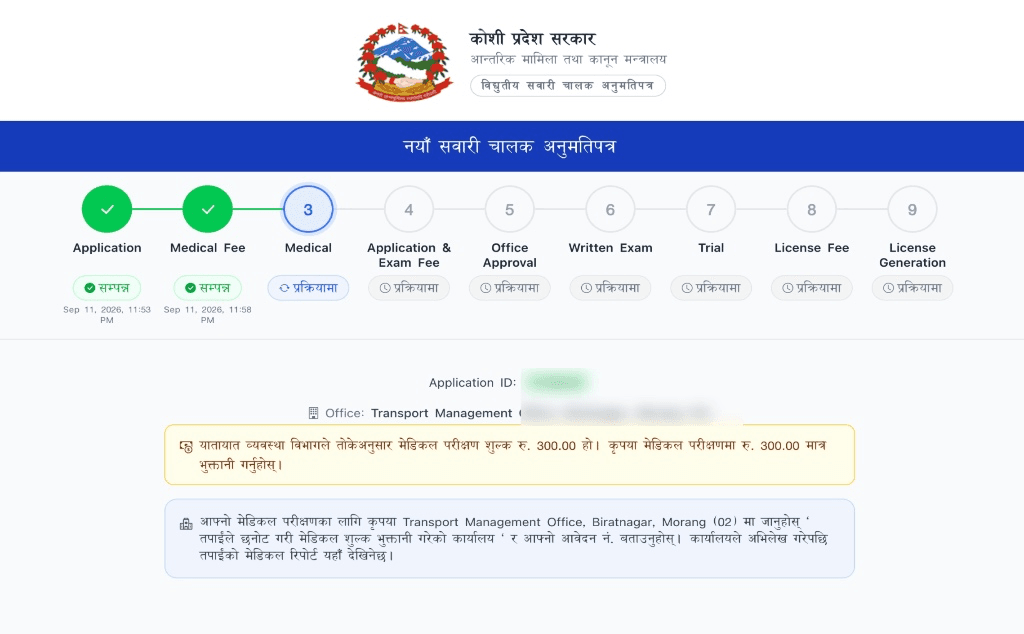
- What to Bring for Medical Examination: Once your payment is verified and the tracking page shows your status, you must print out or carry a digital copy of the downloaded PDF application slip (which contains your Application ID, NID, and QR code). You need to physically visit your selected transport office (e.g., Transport Management Office, Biratnagar) along with your original Nepali Citizenship Certificate and the downloaded PDF slip. The medical officer or office desk will verify your details, update your medical report in the official system, and then you will be cleared for the written exam and trial stages.
Step 12: Medical Completion, Application & Exam Fee, and Office Approval
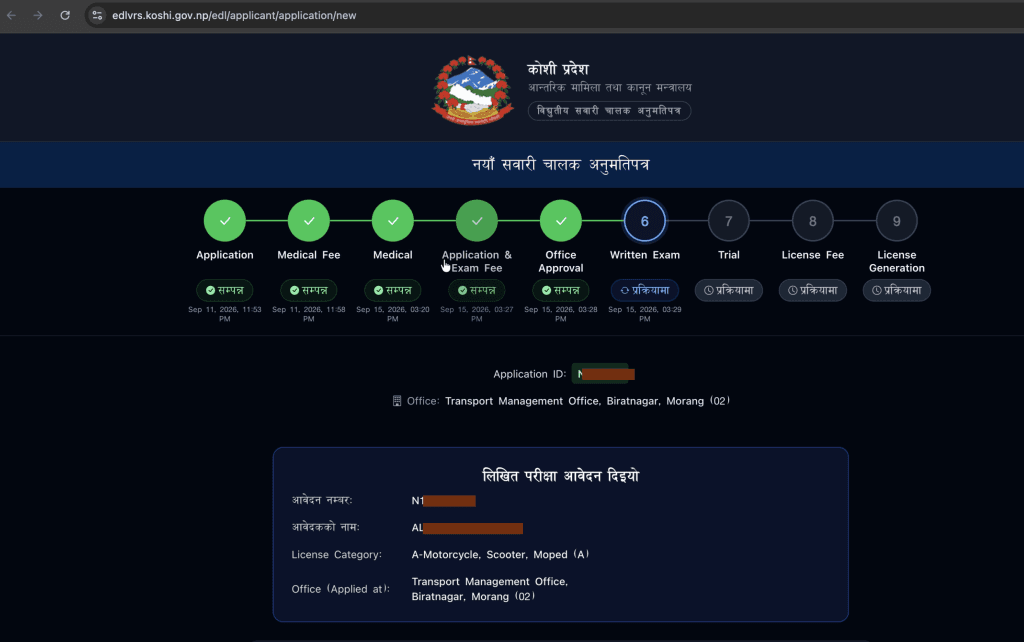
After visiting the transport office for your physical medical examination and completing the necessary procedures, you can check your updated application status and results by following these steps:
- Check Status via Previous Tracking Link: Open the application tracking link (which you obtained by scanning the QR code from your downloaded PDF slip in Step 11) to check your current application progress.
- Medical Examination Status: Once the transport office updates your medical report in the system, refreshing your tracking page will show a green checkmark indicating that your Medical step is successfully completed (सम्पन्न).
- Application & Exam Fee Payment: You can pay your Application and Exam Fee (e.g., Rs 1500) either online through the portal or directly at the office counter. Once paid and verified, this step will also show as completed with a green checkmark.
- Office Approval: After the verification of your medical report and fees, the transport office will review and approve your application form. The Office Approval step will then display a successful green status, clearing you to move forward to the Written Exam stage.
Download Your Written Entrance Card
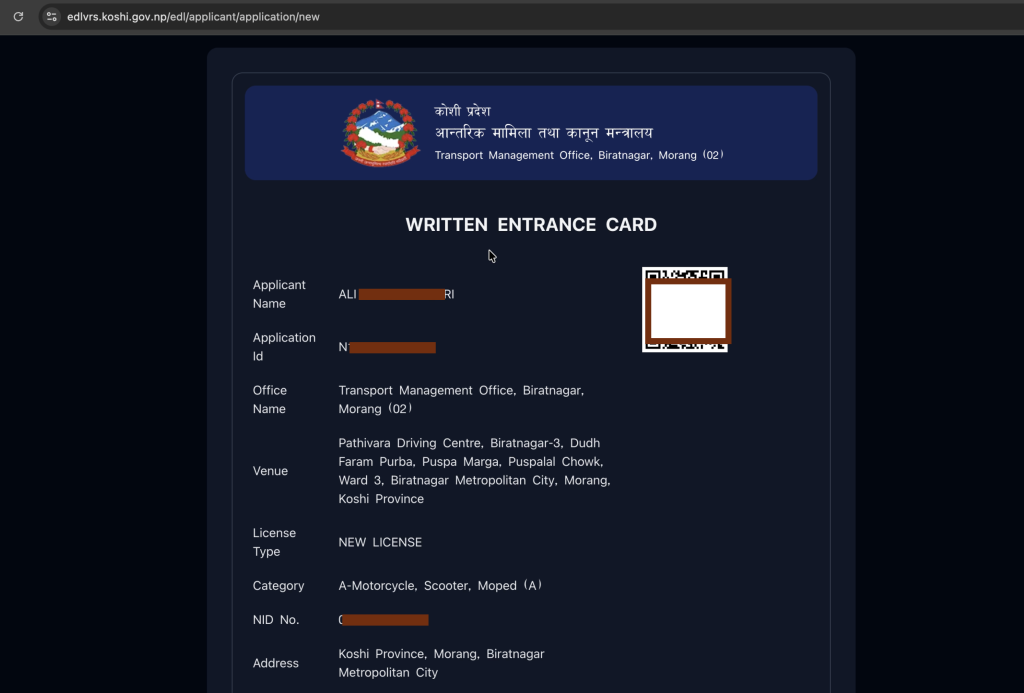
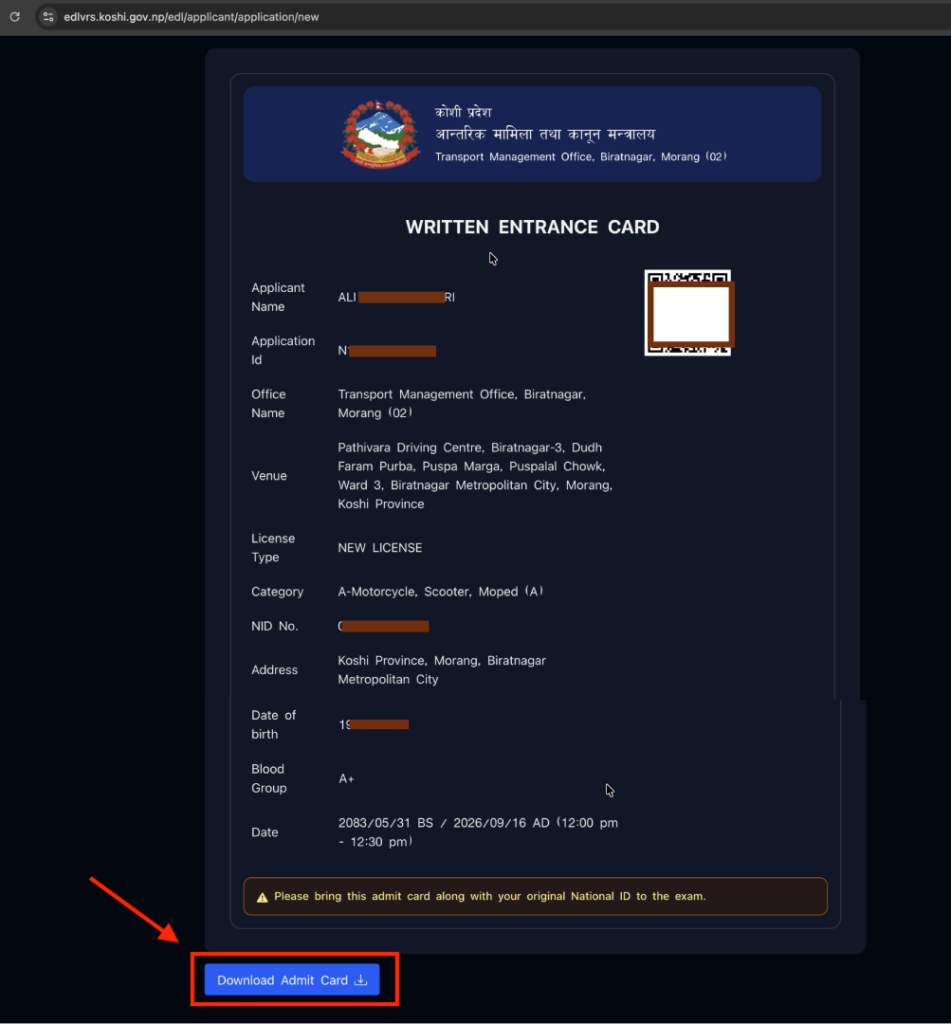
Once your application is approved by the office and you clear the previous steps, the Written Entrance Card (प्रवेशपत्र)will appear at the bottom of your tracking page.
- Check Exam Details: The admit card displays all your important information, including your Applicant Name, Application ID, NID No., Date of Birth, and Blood Group.
- Exam Venue & Schedule: It clearly specifies the Venue (e.g., Pathivara Driving Centre, Biratnagar) where you need to report for your written exam, along with the exact Date and Time (BS/AD format).
- Download Admit Card: Click on the blue ‘Download Admit Card’ button located at the bottom to save the PDF card on your device.
- Important Note: As mentioned on the card, you must print and bring this admit card along with your original National ID (NID) or Citizenship to the exam center on your scheduled date.
Step 13: Checking Written Exam Result & Booking Trial Date
Once you complete your written exam and the results are updated (usually after 24 hours), you can check your status by scanning the tracking QR code from your previous PDF slip or your new admit card. Both QR codes will instantly redirect you to your official application tracking page.
- Check Written Exam Status: Opening your tracking page will now show a green checkmark indicating that your Written Exam is successfully completed (सम्पन्न).
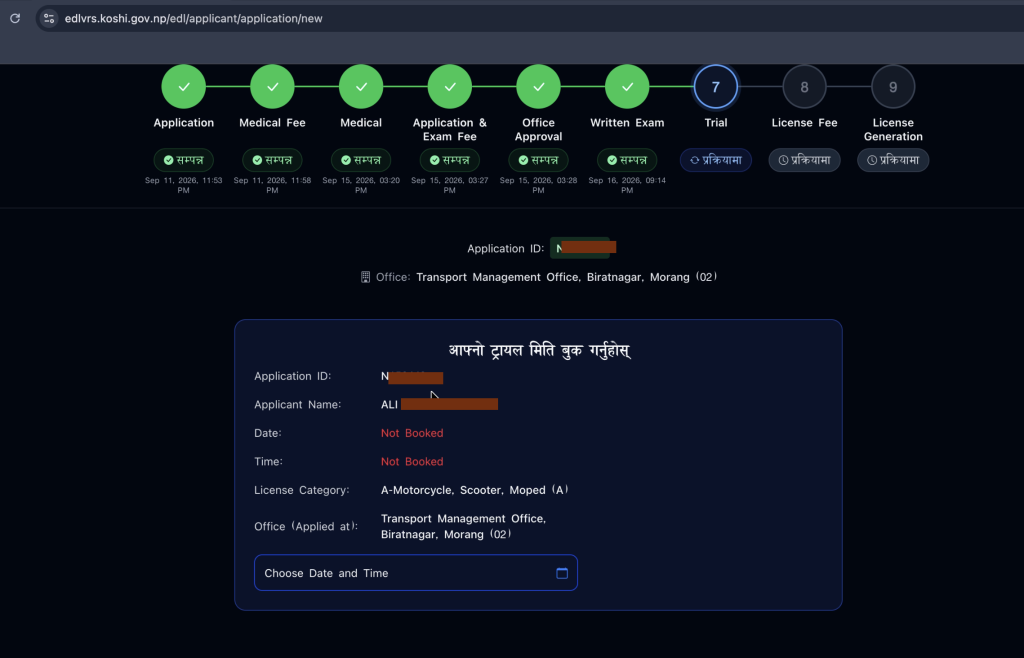
- Choose Trial Date & Time: Below your application details, you will see an option to book your trial date. Click on the ‘Choose Date and Time’ button to open the calendar interface.
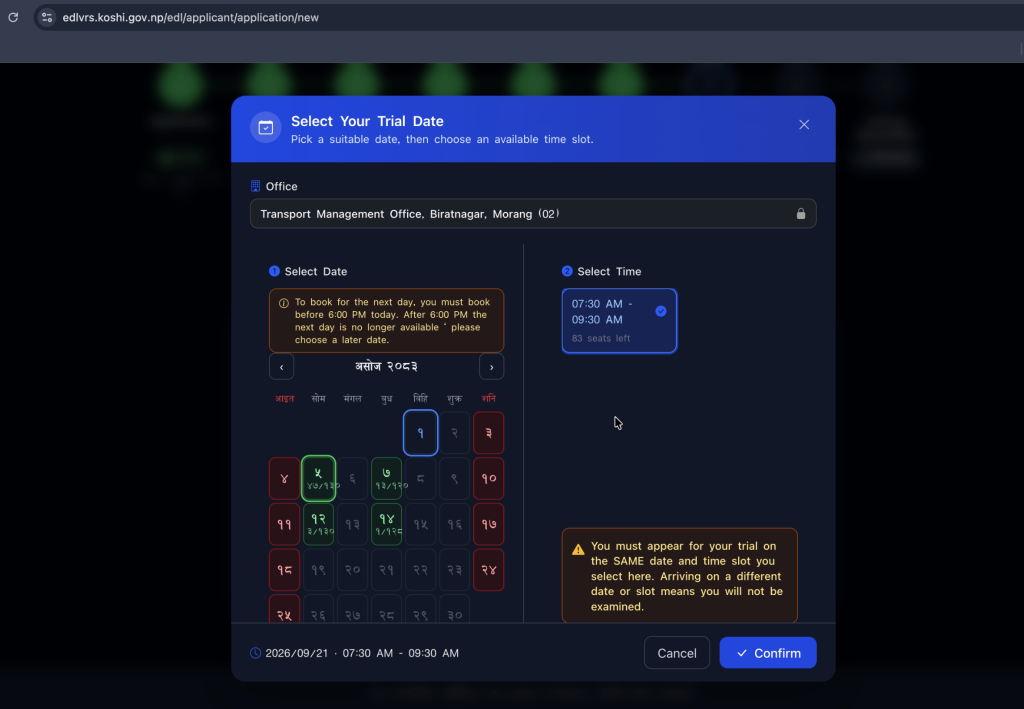
- Select Suitable Date & Slot: A calendar pop-up will appear showing available dates (highlighted in green with remaining seat quotas) and closed/holiday dates (in red). Pick your preferred date, select the available time slot (e.g., 07:30 AM – 09:30 AM), and click on ‘Confirm’.
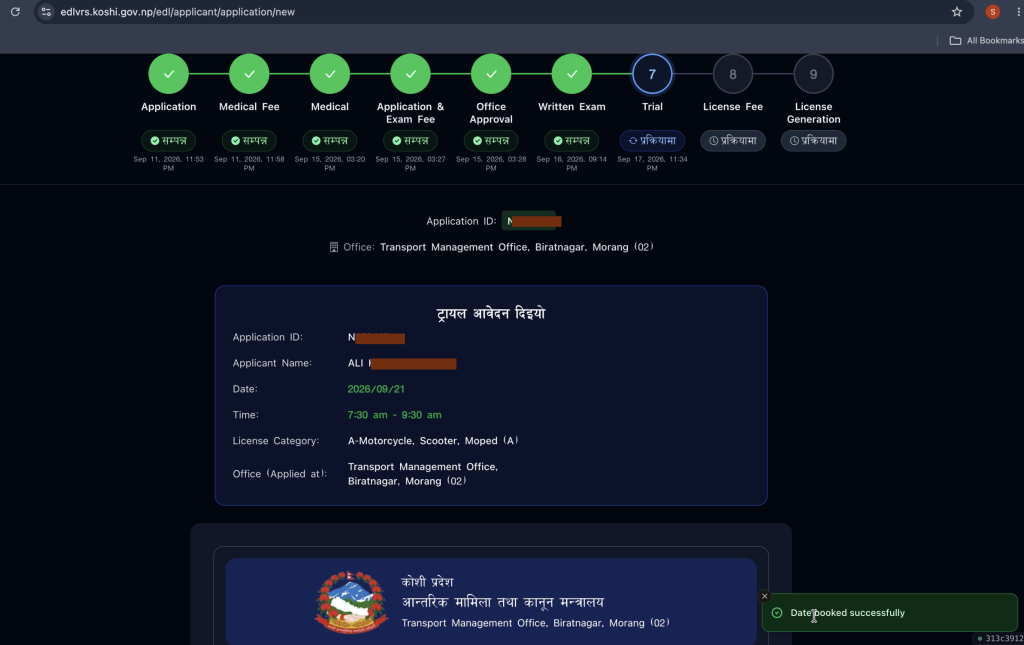
- Successful Booking & Admit Card: Once confirmed, your trial date and time will be successfully booked. The portal will display your confirmed schedule details along with a notification saying “Date booked successfully”, and your Trial Admit Card will be generated below.
How to Download Trial Admit Card & Important Guidelines
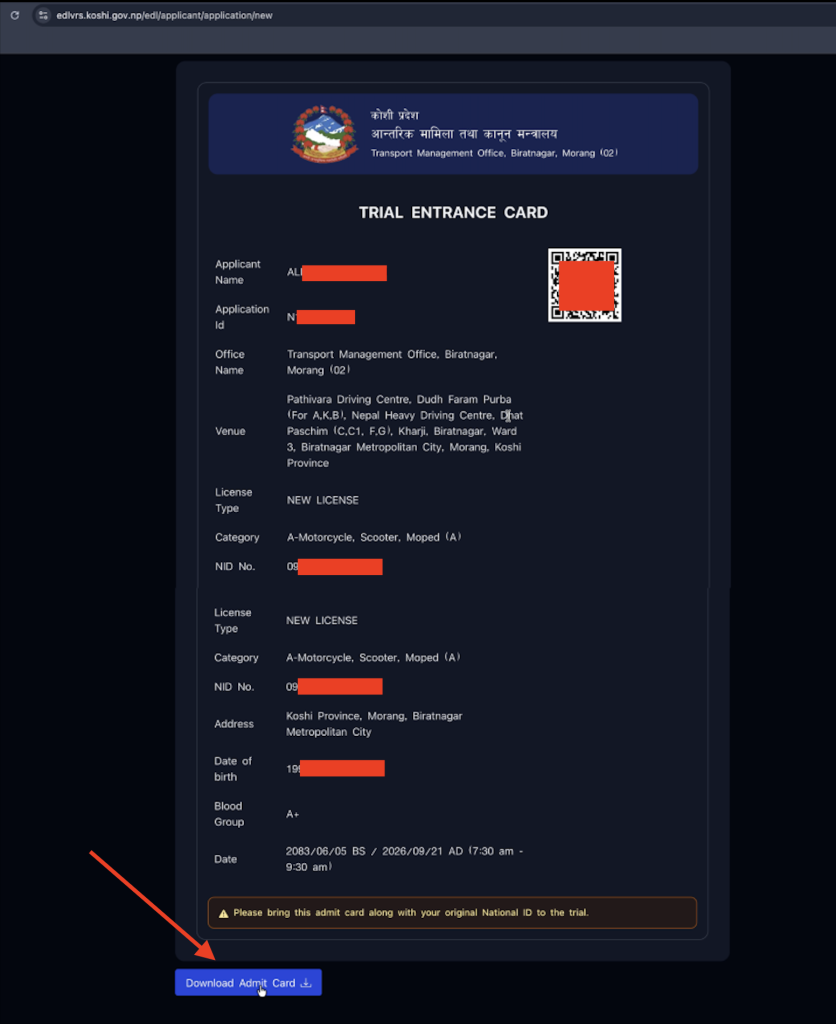
After your trial date and time are successfully booked, your TRIAL ENTRANCE CARD will be generated at the bottom of the tracking page.
- Locate the Download Option: Scroll down to the TRIAL ENTRANCE CARD section on your portal screen. You will see your complete trial schedule, including the assigned Venue, Category, Date, and Time Slot.
- Download the PDF Card: Click on the blue ‘Download Admit Card’ button located at the bottom of the page. This will instantly download your official PDF entrance slip to your device.
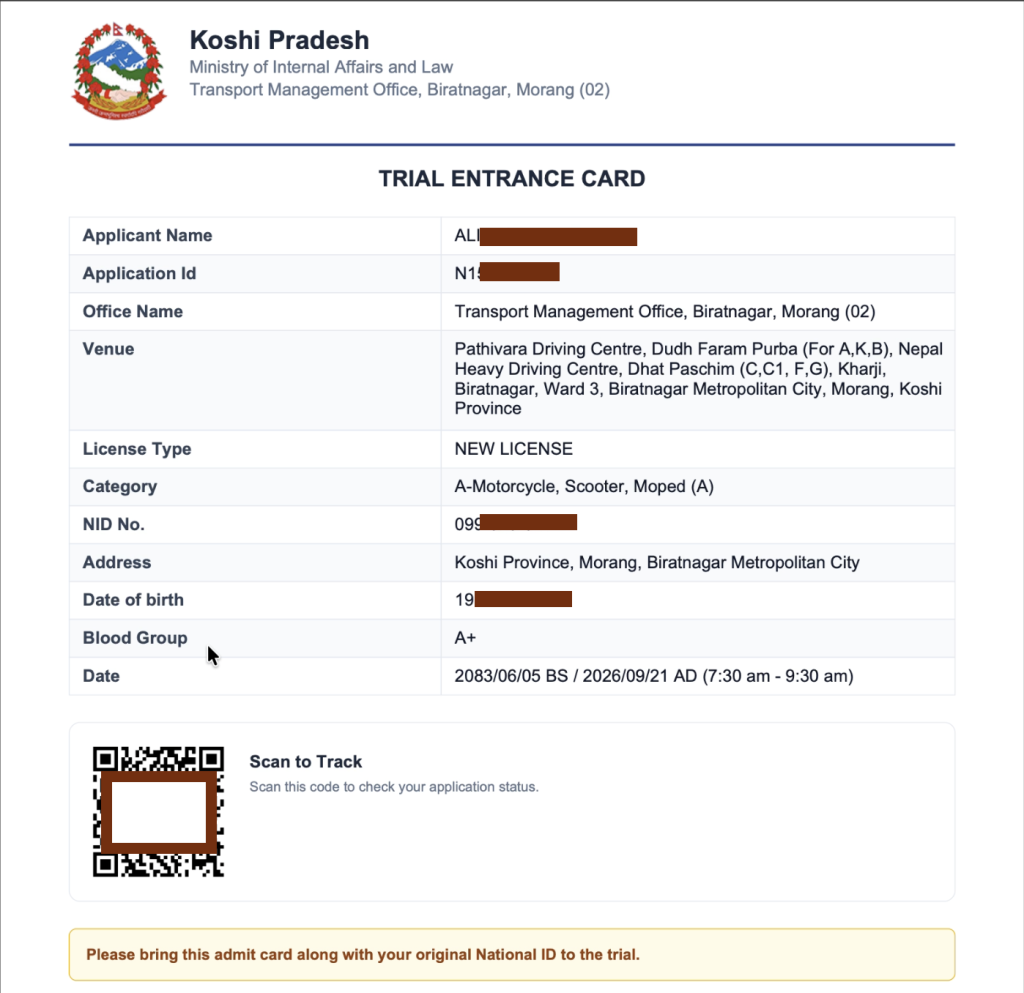
- Details on the Downloaded PDF: When you open the downloaded PDF file, it displays your official Trial Entrance Card issued by the Ministry of Internal Affairs and Law. It contains:
- Personal Details: Applicant Name, Application ID, Category, NID No., Address, Date of Birth, and Blood Group.
- Trial Location & Schedule: The exact exam center venue (e.g., Pathivara Driving Centre) along with the confirmed Date & Time Slot (BS/AD format).
- Scan to Track QR Code: A dedicated QR code to track your future trial exam status.
- Personal Details: Applicant Name, Application ID, Category, NID No., Address, Date of Birth, and Blood Group.
- Mandatory Requirement for Trial Day: Print a clear physical copy of this PDF admit card. You MUST bring this printed Trial Entrance Card along with your original National ID (NID) or Citizenship Certificate to the trial center on your scheduled date and time.
Step 14: Checking Trial Result, Paying License Fee & Final Success
After appearing for your trial exam, you can check your results after 24 hours by scanning the tracking QR code from your PDF slip or admit card.
- Check Trial Result (Passed): Opening your tracking page will now show a green checkmark with the status “Passed” under the Trial section, confirming that you have successfully cleared the trial exam.
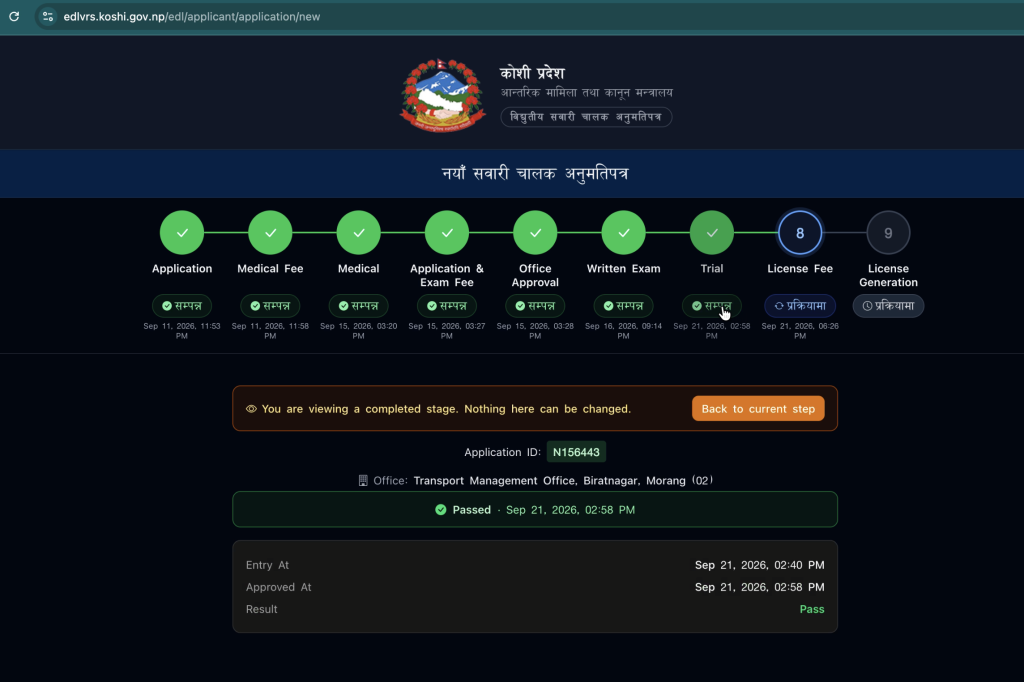
- Proceed to License Fee (License Fee): Click on the ‘License Fee’ option (Step 8) in the progress bar to pay your final licensing fee.
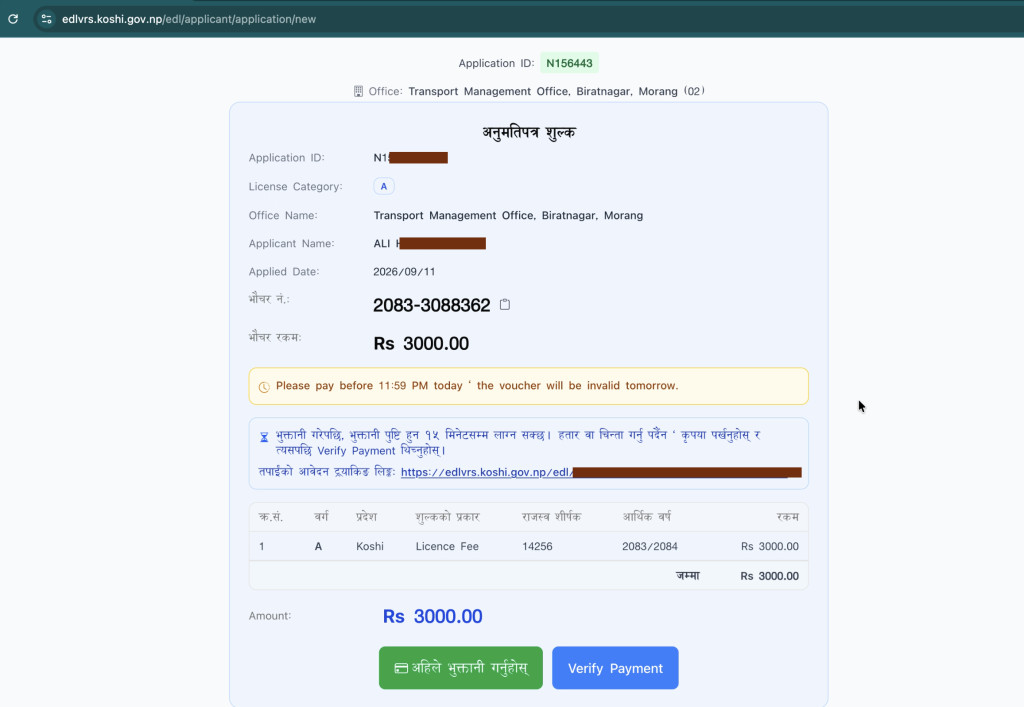
- Review Fee Details: The portal will display your voucher number, applicant details, and the total payable amount (e.g., Rs 3000.00 for the new license fee).
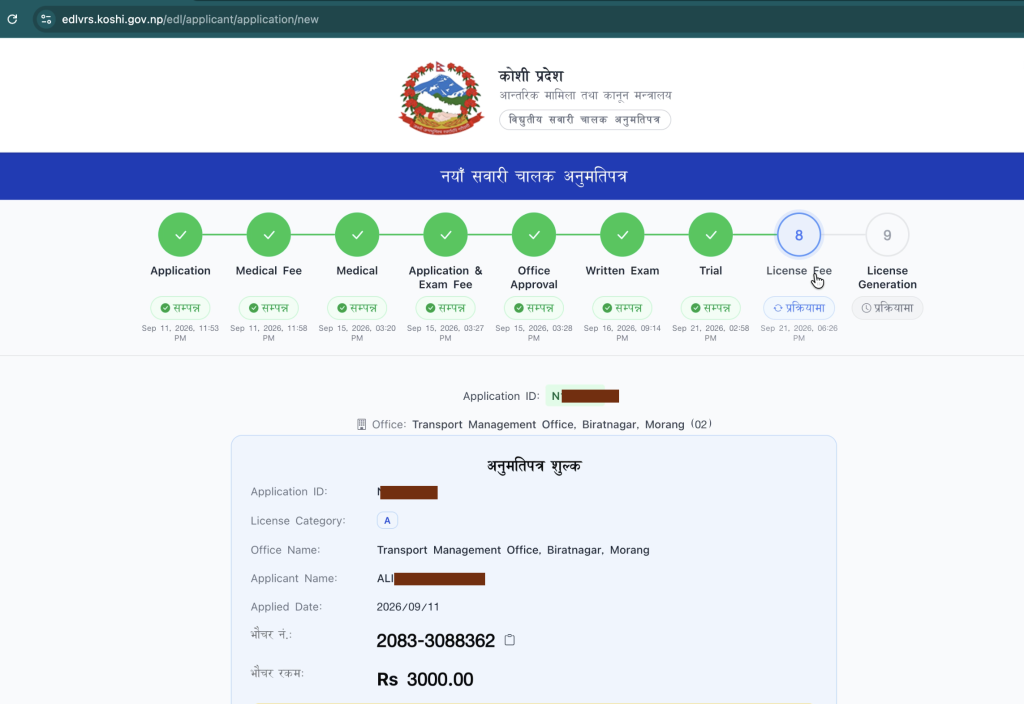
- Payment Gateway & QR Option: Review the details and click on ‘अहिले भुक्तानी गर्नुहोस्’ (Pay Now). It will redirect you to the secure government revenue payment gateway, where you can choose payment options like eSewa, Khalti, connectIPS, or Nepal Pay QR.
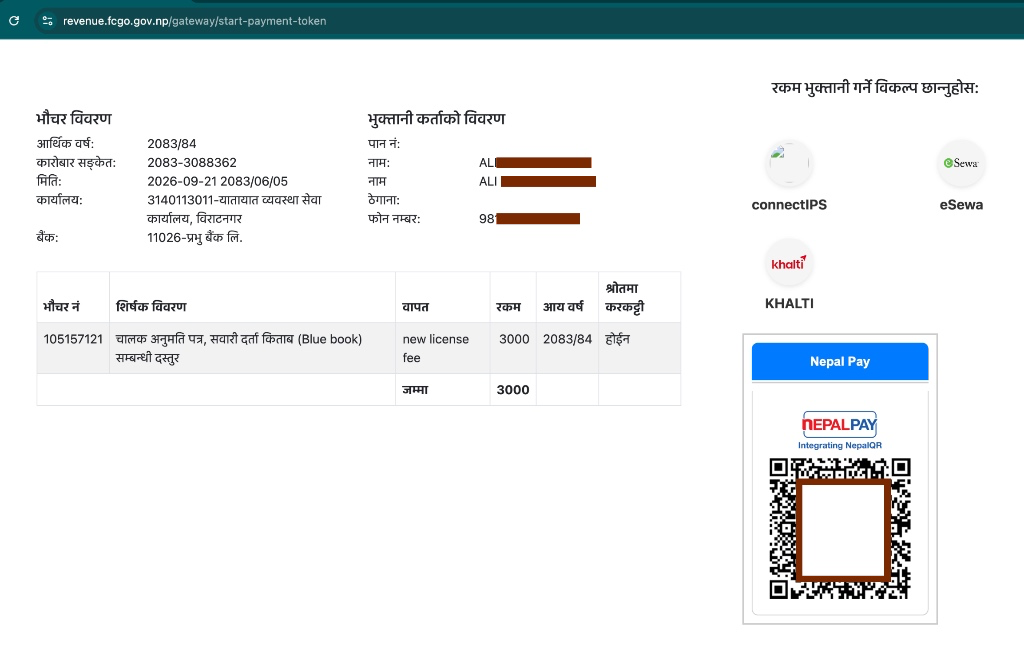
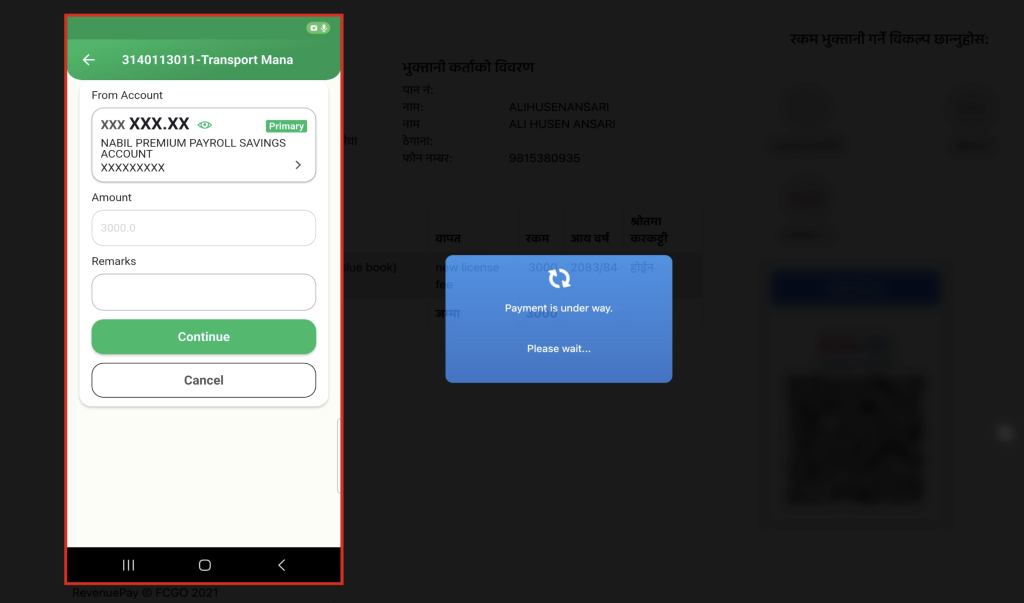
- Complete Payment: Scan the Nepal Pay QR code using your mobile banking app or complete the transaction via eSewa/Khalti. After authorization, a loading screen will show “Payment is under way” and process the payment securely.
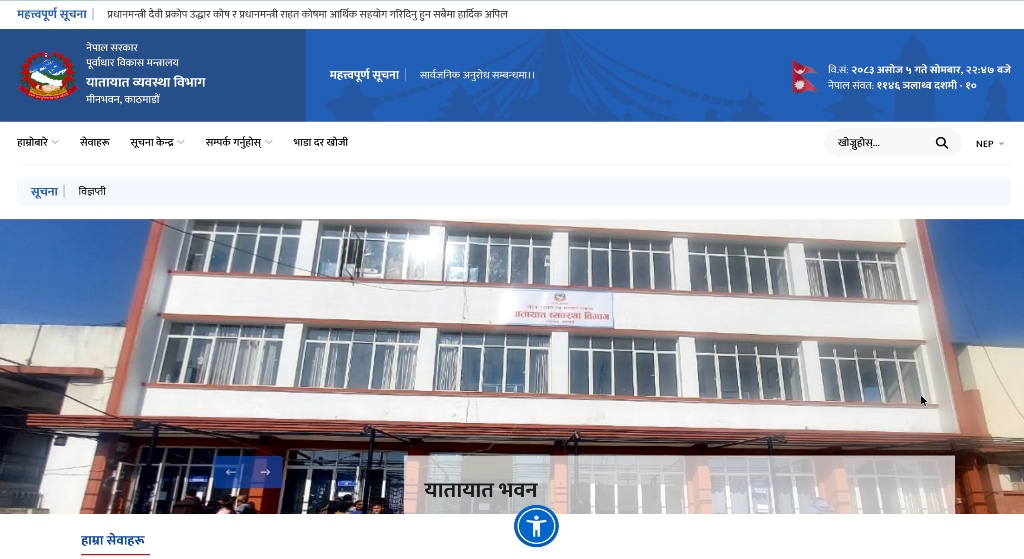
- Redirect to Official Site: Once the payment is successfully verified, the system will automatically redirect you back to the official department portal.
- Return to Tracking Page & Final Success: To verify if your payment was successful and check your final status, scan your tracking QR code again to return to your application tracking page. Refreshing or opening the tracking page will now show that the License Fee and License Generation steps are completed. A congratulatory message will appear: “Congratulations! Successful Passing Your License Written and Trial Exam”, along with your official License Number (e.g., 01-XX-XXXXX).
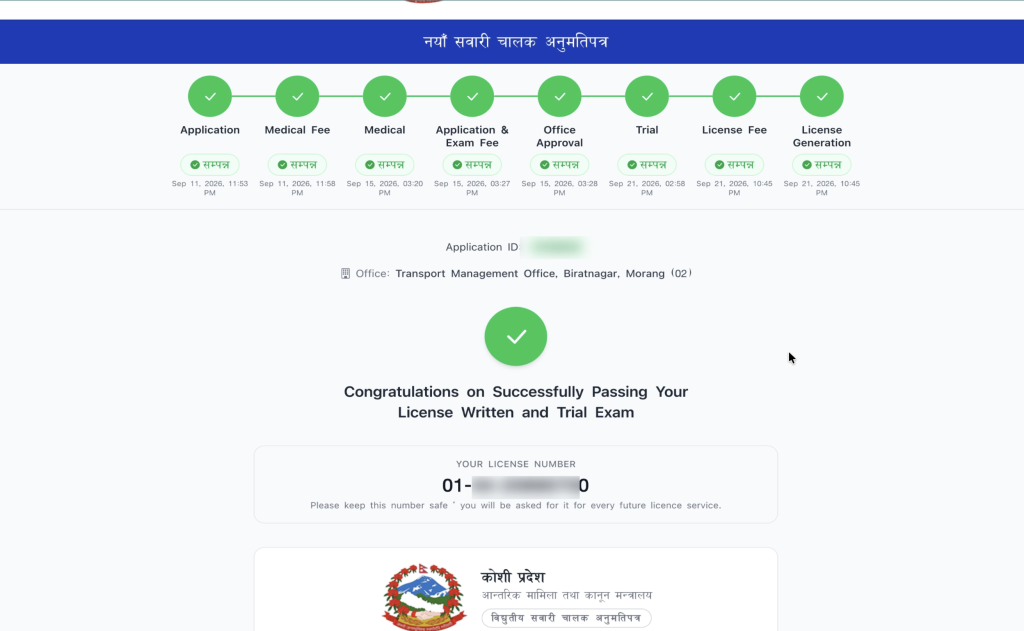
Downloading Digital Driving License & Card Preview
Once your payment is verified and the final success message appears, your official digital driving license will be generated on the portal. You can view, download, and check the complete details as explained below:
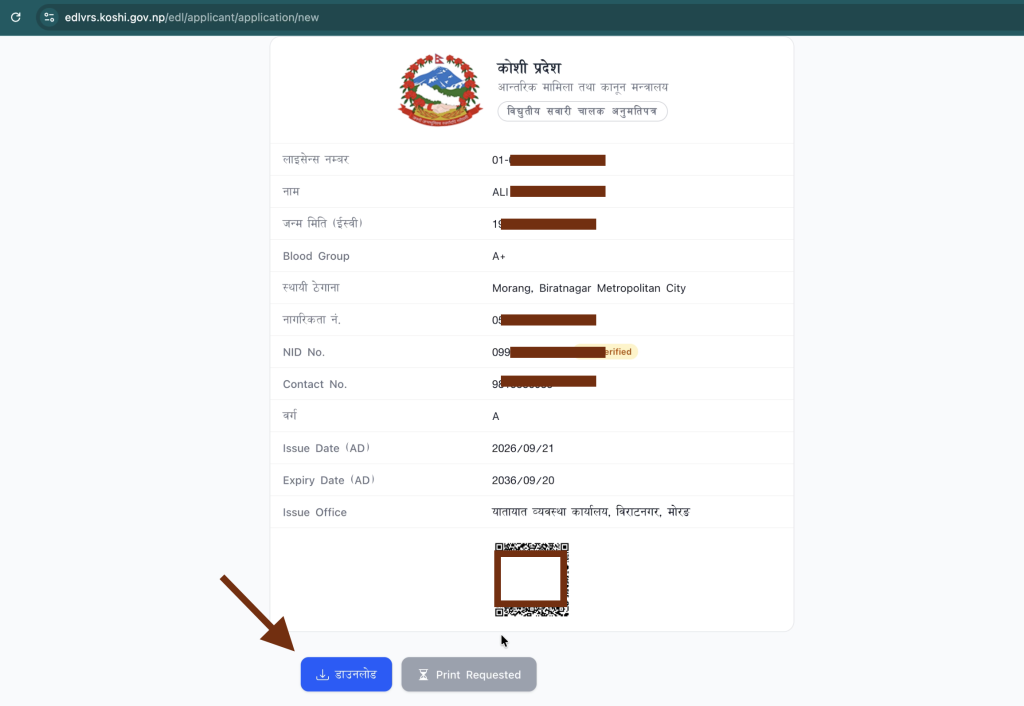
- Digital License Information & Download: The page displays your complete digital driving license details, including your License Number, Full Name, Date of Birth (AD), Blood Group, Permanent Address, Citizenship No., NID No., Contact Number, License Category (e.g., A), Issue Date, Expiry Date, Issue Office, and an official verification QR code. By clicking the blue ‘डाउनलोड’ (Download) button at the bottom, you can instantly download your official digital driving license as a PDF file to your device.
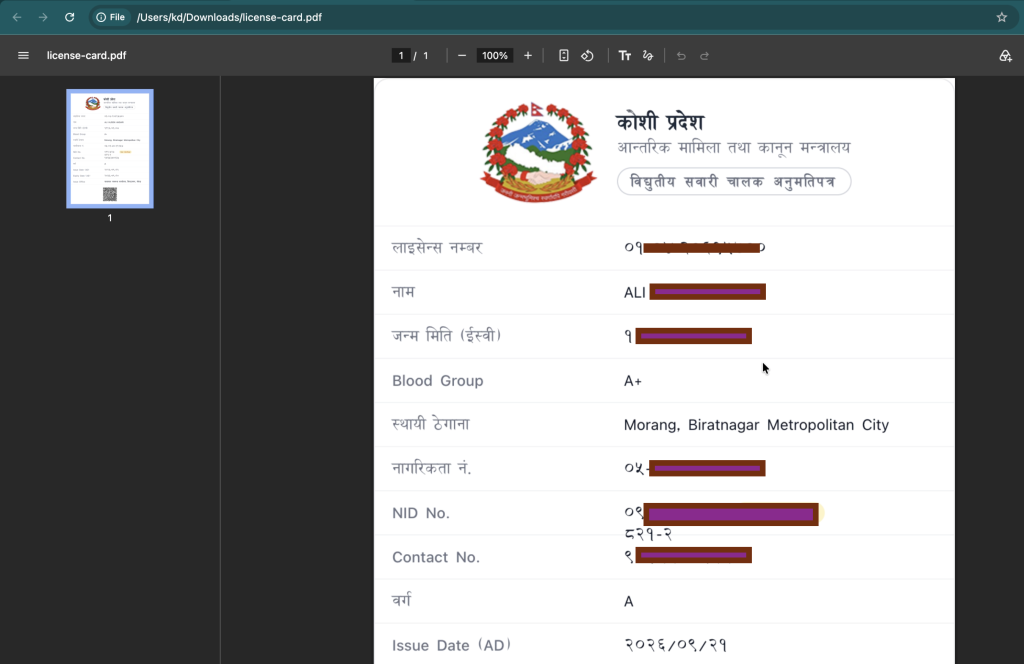
- Downloaded PDF License View: When you open the downloaded
license-card.pdffile, it presents a clean, official document containing all your personal details, license category, issue/expiry dates, and verification codes formatted neatly for offline use or printing.
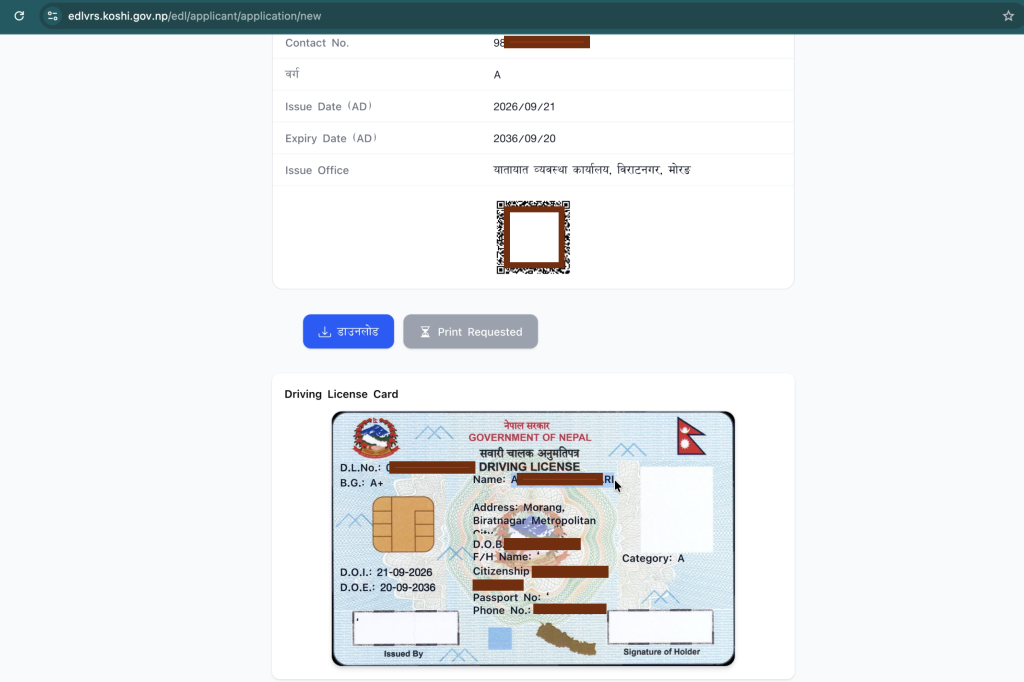
- Driving License Card Preview & Photo Source: Scrolling down slightly past the download section will show a visual preview of your official physical Driving License Card format.
- Automatic Photo Integration: Your photograph and signature automatically appear here, which are securely fetched and linked directly from your National Identity Card (NID) system.
- Note: If you notice any issues or if your photo does not appear correctly, you can visit the transport office for necessary verification and corrections.
- Automatic Photo Integration: Your photograph and signature automatically appear here, which are securely fetched and linked directly from your National Identity Card (NID) system.
How can I check my online driving license form status in Nepal?
You can easily check your application status by scanning the tracking QR code found on your downloaded PDF slip or admit card using your smartphone camera or utility apps like Smart Patro.
What should I do after passing the written and trial exams?
After passing both exams, you need to pay the final license fee (e.g., Rs. 3000) online through eSewa, Khalti, connectIPS, or Nepal Pay QR, after which your digital license will be generated.
Where does the photo on the digital driving license come from?
The photo and personal details on your digital driving license card are automatically fetched from your linked National Identity Card (NID) database.
Conclusion
Applying for and tracking your online driving license Nepal has become much more transparent and digital through the official DoTM and provincial portals (such as Koshi Province). By following this step-by-step guide on how to apply driving license online Nepal, fill out the driving license form Nepal, and complete your payments, exams, and digital card downloads, you can easily secure your driving license online.
Video Tutorial
If you prefer a visual guide on how to complete the entire process of your driving license online apply provinces and download your digital card, watch the complete video tutorial below: